Do you like to collect wildflowers, plants from ditches or tree leaves that litter the ground? To preserve them, create a herbarium. A simple task that will allow you to admire your finds for years to come.
Collect plants: Explore nature and collect plants, leaves and flowers that interest you. Be sure to respect local regulations and preserve the flora.
What materials are needed to make a herbarium?
No need to be a botanist or naturalist to create a herbarium ! True, originally this type of work was carried out for scientific purposes. But everyone can very well create a herbarium for their own pleasure, as a leisure activity, alone or in company. And children can be involved. Creating a herbarium is first and foremost an outdoor activity , since you have to pick plants and flowers either from nature or from your garden. It is then an indoor activity, for drying and assembly.
The only constraints: find out about protected or threatened plant species , because respect for nature must take precedence over collection. Collect only one specimen, and only if there are others nearby – do not collect a solitary plant. Finally, avoid picking large quantities at once, as the plants risk rotting or molding if you do not take the time to dry them quickly. Collect the plants in dry weather and preferably in the afternoon, when the dew has evaporated. The more humid the plants are, the more likely they are to deteriorate or store poorly. Apart from these few requirements, herbalizing for pleasure is almost child’s play. Especially since the necessary equipment is not very expensive and is very easy to find.
For harvesting, you must have a small pruner, in order to cut the part of the plant that interests you. Also bring a notebook where you will write down the information that you consider essential concerning the plant collected: for example its exact color, its scent, the place of the find, the date, etc. A short guide to the flora can be useful in identifying species. You can equip yourself with a herbal box, a sort of cylindrical container to store the various plants throughout the harvest. But plastic bags – such as freezer bags – are more than enough, provided you provide one for each plant. Also collect old newspapers , which will be used for drying. Get some blotting paper to absorb excess moisture. As a press, you can use two boards held together using a strap. But large dictionaries with smooth covers are also ideal.
Making a herbarium drying, a crucial step!
Proceed with drying as soon as you return home with your harvest, before the plants wilt. It’s best to prepare piles of newspaper and blotting paper in advance. Carefully spread each specimen inside a double sheet of newspaper , trying not to make any “creases”. Write the name of the plant on each sheet, or number them according to the notes made in the notebook. Place a sheet of blotting paper between each paper folder. Gently stack the shirts and place them between the two boards, which you will hold tight with the strap – or the two large books. The drying of the plants lasts approximately three weeks. The first week, you must change the sheets of newspaper and blotting paper daily, in order to absorb all the humidity and prevent any risk of mold. Then make the change every two or three days.
Making a herbarium what to do once the plants have dried?
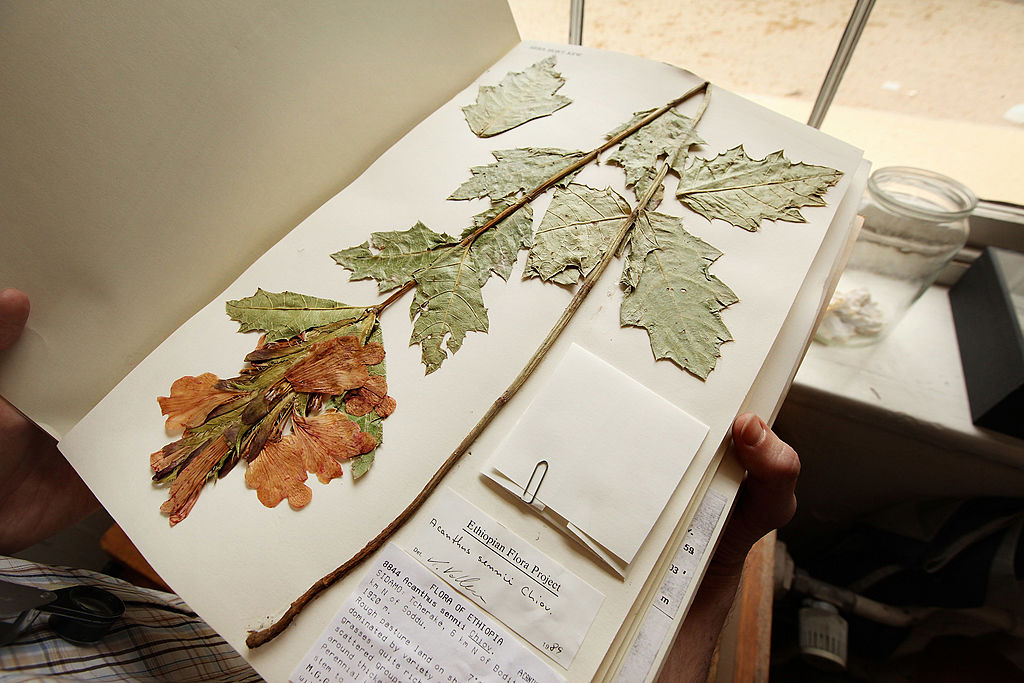
When the plants are completely dried, you can proceed to making the boards . Obtain sheets of thick paper – such as Canson drawing paper – in A4 format (21 x 29.7 cm) or larger (A3) if you want a large format herbarium. Strips of gummed paper – which becomes sticky when moistened – are very useful for securing dried specimens. They can be peeled off and re-glued. Additionally, these paper strips keep much better than plastic tape.
Making a herbarium: the very last steps
Finally, plan labels which will be stuck on each page of the herbarium, with the name of the plant and the information you wish to include there, written in ink – avoid ballpoint pen . To bind your herbarium, you can either group the boards in a drawing board, or perforate them and assemble them in a binder, inserting a sheet of glassine paper between each of them. This type of paper is ideal because it is thin, semi-transparent, insulates fragile boards and resists humidity. And if you have a good pencil, why not decorate the cover of your herbarium , or add some colorful drawings – or watercolors – of flowers corresponding to those you have collected?
To see the botanical gallery of the National Museum of Natural History!
Opened to the public in 2024, the botanical gallery of the National Museum of Natural History, in Paris, presents a permanent exhibition evoking the first botanists and those of today, as well as their activity. Visitors are welcomed in the hall by the busts of two of them: Michel Adanson (1727-1806) and Antoine-Laurent de Jussieu (1748-1836). Then, the eye is drawn to a giant slice of redwood trunk (2.70 m in diameter). Then come the lined up display cases containing herbarium plates, astonishing specimens of seeds or fruits. Botany not only involves collecting but also has concrete applications, notably in pharmacopoeia, medicine, chemistry… In addition to the gallery, the building houses the National Herbarium, the largest and oldest in the world! It actually contains 8 million specimens ! And the collection grows from year to year. The Herbarium, accessible only to researchers, attracts botanists from all over the world. But the public can also see some of these plates, 6 million of which have been digitized and put online on a website that can be consulted by all. Amateur botanists can even enrich this database.